I had 38 slides I didn’t write, data I hadn’t gathered, and a managing partner expecting a “seamless transition” in 4 days.
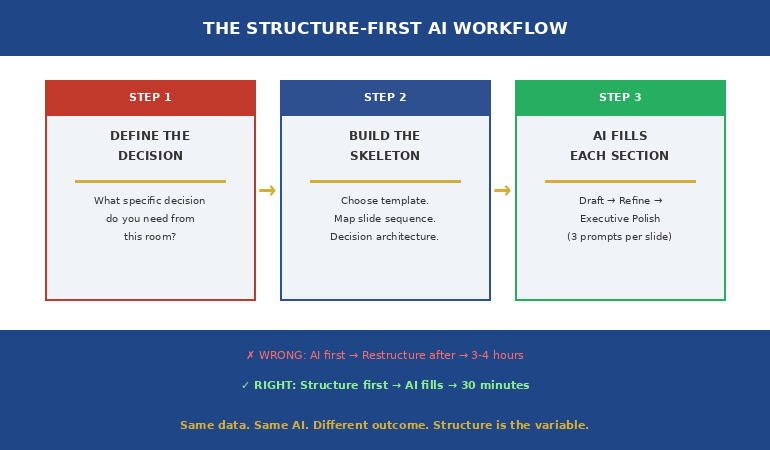
Quick Answer: When you’re presenting an inherited deck, the mistake is trying to learn someone else’s argument well enough to present it authentically. You can’t — and the room will hear the difference. Instead, use the Transplant Method: strip the inherited deck down to its data and evidence, build a new structural skeleton around YOUR recommendation, then slot the surviving slides into your structure. You keep their research. You present your argument.
In this article:
- Why presenting someone else’s deck always sounds wrong
- The Transplant Method: Strip → Skeleton → Slot
- The 4 slide types worth keeping (and the 6 you bin)
- How to present data you didn’t gather (without losing credibility)
- The 90-minute restructure: step by step
- When they ask about the person who left
- Frequently asked questions
At PwC, an associate director left the firm mid-quarter. I inherited his portfolio review — including a 38-slide quarterly deck he’d built over six months. Different analysis frameworks. Different narrative threads. Three separate storylines that made sense to him and made no sense to anyone who hadn’t been in his meetings for the past two quarters.
The managing partner expected the review on Thursday. I had the deck on Monday. Four days.
The obvious move: learn his 38 slides well enough to present them coherently. I tried. By Tuesday afternoon, I was rehearsing someone else’s argument in someone else’s voice, and it sounded exactly like what it was — a person reading slides they didn’t write.
So I stopped trying to present his deck. Instead, I printed all 38 slides on paper, spread them across a conference table, and asked myself one question: “What is MY recommendation to the managing partner?”
I kept 11 slides — the data slides, the client feedback, the financial summaries. I built a new 5-slide skeleton around my own recommendation. The other 27 slides went to appendix.
The managing partner’s response: “That’s the clearest update we’ve had in two years.”
He didn’t know 27 slides had been cut. He didn’t need to.
⚡ Presenting an inherited deck this week? 90-minute rescue checklist:
- ☐ Print every slide — spread them on a table, not a screen
- ☐ Write YOUR recommendation in one sentence (not theirs)
- ☐ Pull ONLY slides with data, evidence, or client feedback — bin the narrative slides
- ☐ Build a 5-slide skeleton: Recommendation → Evidence → Options → Ask → Timeline
- ☐ Move everything else to appendix (don’t delete — you may need it in Q&A)
🚨 Inherited a deck and presenting this week? Quick check: Can you state YOUR recommendation in one sentence — not the original author’s? If you’re still presenting their argument, the room will hear it. → Need the structural skeleton that makes any inherited deck yours? Get the Executive Slide System → £39
Why Presenting Someone Else’s Deck Always Sounds Wrong
You’ve probably experienced this as an audience member. Someone stands up, clicks through slides, and something is slightly off. The transitions don’t flow naturally. The emphasis lands in odd places. The presenter hesitates before certain data points — not because they don’t know the number, but because they don’t know why that number matters in this specific sequence.
That’s what happens when you present an inherited deck. The original author built the slides in an order that made sense to their thinking process. Slide 7 references a conversation from slide 3. Slide 14 assumes the audience has absorbed the framework on slide 9. The logic is invisible — it lives in the original author’s head, not on the slides.
When you try to present someone else’s argument, three things go wrong:
You can’t control the emphasis. The original author knew which slides were important and which were context. You don’t. So you give equal weight to everything — which means the room gets 38 slides of flat information with no peak moments.
You can’t handle the Q&A. Someone asks “Why did you choose this methodology?” and the honest answer is “I didn’t — the person who left did.” That’s not a credibility-building moment. If the deck is truly someone else’s argument, the questions will expose it.
You sound scripted. Executive audiences can hear the difference between someone presenting their own thinking and someone reciting slides. The pauses are wrong. The confidence fluctuates. The “let me add some context” moments feel rehearsed rather than spontaneous — because they are.
This is why the solution isn’t to learn the inherited deck better. It’s to replace the argumentative skeleton while keeping the evidence. That’s the Transplant Method.
How do you present a deck you didn’t create?
You don’t present their deck — you present your recommendation using their data. Strip the inherited deck down to evidence slides (data, financials, client feedback, benchmarks). Build a new structural skeleton around your own recommendation and analysis. Slot the evidence slides into your structure. The data is theirs. The argument is yours. The audience hears someone who owns the content, not someone reading someone else’s notes.
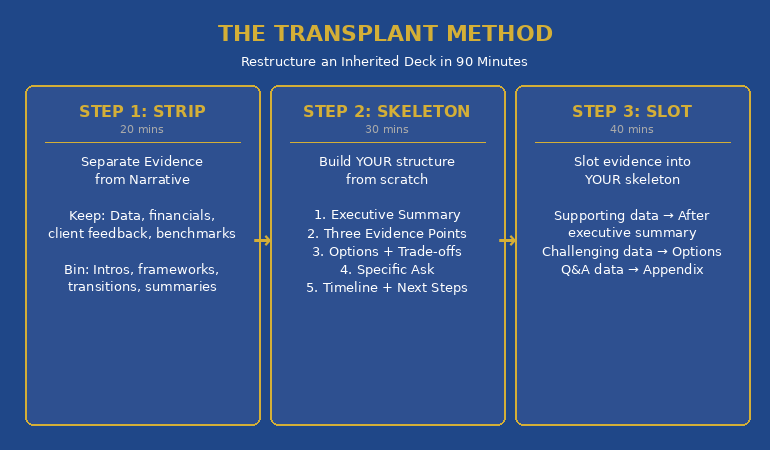
The Transplant Method: Strip → Skeleton → Slot
The Transplant Method has three steps. It takes 90 minutes for a 30-40 slide inherited deck, and it works regardless of how well you understand the original author’s logic — because you’re replacing their logic with yours.
Step 1: Strip (20 minutes). Print every slide. Physically separate them into two piles: Evidence (data, charts, financials, client quotes, benchmarks, survey results) and Narrative (introductions, context-setting, analysis frameworks, transition slides, summary slides). The Evidence pile stays. The Narrative pile goes to appendix. You’re keeping the research while discarding the argument.
Step 2: Skeleton (30 minutes). Before touching the Evidence slides, build a 5-slide structural skeleton from scratch. This skeleton represents YOUR recommendation, not theirs. The structure: (1) Your executive summary with your recommendation stated in the first sentence. (2) The three strongest evidence points supporting your recommendation. (3) Options with trade-offs — including “maintain current approach.” (4) Your specific ask with a deadline. (5) Timeline and next steps. This skeleton is the argumentative spine of the presentation.
Step 3: Slot (40 minutes). Now take the Evidence slides and slot them into the skeleton. Which data supports your recommendation? That goes after the executive summary. Which data shows the cost of inaction? That supports the options slide. Which data addresses likely objections? That goes in appendix for Q&A. Some evidence slides may need minor edits — a title change, a highlighted data point — but the content stays the same.
⭐ Turn 38 Inherited Slides Into 12 That Sound Like You
The Executive Slide System gives you the structural skeleton for Step 2 of the Transplant Method — the 5-slide recommendation framework that replaces someone else’s argument with yours. Pick the template that matches your scenario, drop your evidence slides in, and present with authority.
Your inherited deck toolkit:
- Executive Summary template — your recommendation in the first sentence, not the original author’s context-setting
- Strategic Recommendation template — recommendation-first structure with options and trade-offs
- AI prompt: “Rewrite these inherited slide titles to reflect my recommendation” — instant authority
- 15 scenario playbooks — find “took over mid-project” and follow the template + prompt sequence
Get the Executive Slide System → £39
Built from 24 years of mid-project handovers, role transitions, and inherited presentations at JPMorgan, PwC, RBS, and Commerzbank.
The 4 Slide Types Worth Keeping (And the 6 You Bin)
Keep: Data slides with numbers. Revenue charts, performance metrics, financial summaries, benchmark comparisons. These are facts — they don’t belong to the original author. Relabel them to support your argument, but the data stands on its own.
Keep: Client or stakeholder feedback. Direct quotes, survey results, NPS scores, satisfaction data. This is primary evidence that strengthens any argument, regardless of who gathered it.
Keep: Timeline or milestone slides. What’s been delivered, what’s outstanding, what’s at risk. These are factual and useful for the audience’s decision-making. Update them to current status.
Keep: Risk or issue registers. Any slide that identifies problems, risks, or blockers. This is evidence you can use to support your recommendation — especially if your recommendation addresses these risks differently than the original approach.
Bin: Introduction slides. “About this project,” “Background,” “Purpose of this review.” These set up someone else’s narrative. Write your own 30-second verbal introduction instead.
Bin: Framework slides. “Our approach,” “Methodology overview,” “Analytical framework.” These explain how the original author thought about the problem. You think about it differently. That’s the whole point.
Bin: Transition slides. “Moving on to…” “Now let’s look at…” These are structural connective tissue for someone else’s argument. Your skeleton has its own flow.
Bin: Summary slides. Any slide that summarises what came before — in the original author’s framing. Your executive summary replaces all of these.
Bin: “For discussion” slides. Vague prompts for conversation that the original author planned to navigate. You’ll navigate Q&A based on your recommendation, not their discussion points.
Bin: Thank you / next steps slides. Rebuild these from scratch with YOUR next steps, YOUR timeline, YOUR specific ask.
The 22 templates in the Executive Slide System (£39) give you 22 different structural skeletons — so you’re not building Step 2 from scratch. Pick the one that matches your scenario, and the inherited evidence slots straight in.
How to Present Data You Didn’t Gather (Without Losing Credibility)
The biggest fear with presenting an inherited deck is the moment someone asks about the data and you have to admit you didn’t gather it. Here’s how to handle it without losing authority:
Own the recommendation, cite the source for the data. “Based on the Q3 portfolio analysis conducted by [predecessor’s name/the previous review], my recommendation is…” This is honest, professional, and does something powerful: it separates the DATA (which someone else gathered) from the RECOMMENDATION (which is yours). Nobody expects you to have gathered data from before your involvement. They expect you to have a point of view about what it means.
Know the methodology, not every number. You don’t need to defend every data point. You need to know HOW the data was gathered (which system, which time period, which assumptions). If someone challenges a specific number, the honest response is: “That figure comes from [system/report]. I can verify the specific methodology and come back to you.” This is professional — not weak.
Bring one new data point of your own. Add one piece of data you’ve gathered since taking over — even if it’s small. “Since I took over the portfolio two weeks ago, I’ve verified the top 10 client relationships and can confirm…” This tiny addition signals that you’re not just reading someone else’s work. You’ve started building your own evidence base.
Related: The executive presentation structure shows how to build a recommendation-first format that works regardless of who gathered the underlying data.
What if the inherited deck is poorly structured?
That’s actually easier than inheriting a well-structured deck. A poorly structured deck means the data is buried in a bad argument — which means the Transplant Method gives you a bigger improvement with less effort. Strip the data out, ignore the original structure entirely, and build your skeleton from scratch. The worse the original deck, the more dramatic the improvement when you present your restructured version. The audience will attribute the clarity to you — because it IS from you.
📋 The Inherited Deck Authority Checklist: 7 Slide Title Rewrites
Before you present someone else’s deck, rewrite every slide title using this formula. If the title sounds like something the original author wrote, the audience will hear it.
| Original author’s title | YOUR authority rewrite |
| “Portfolio Overview” | “3 Accounts Underperforming Target by £280K” |
| “Q3 Performance Summary” | “Q3 Revenue Beat Target — Phase 2 Self-Funds” |
| “Key Risks” | “2 Risks Requiring Decision by March 14” |
| “Client Feedback” | “Top 5 Clients: 4 Renewing, 1 At Risk” |
| “Next Steps” | “Decision Needed: Extend Budget by £120K Before April 1” |
| “Project Update” | “Phase 2: On Track for April — 1 Resource Gap” |
| “Recommendations” | “I Recommend Option B: £280K Savings at £45K Cost” |
The pattern: Every rewrite replaces a TOPIC with a VERDICT. The title tells the audience what to think about the slide before they read it. → The Executive Slide System (£39) includes 22 templates with pre-written verdict-style titles for every executive scenario.
The 90-Minute Restructure: Step by Step
Here’s the exact sequence I used for the PwC portfolio review — adapted for any inherited deck of 25-40 slides.
Minutes 1-5: Write your recommendation. One sentence. Not the original author’s recommendation. Yours. “I recommend we consolidate the three underperforming accounts and redirect the relationship management resource to the top 5 growth clients.” If you can’t write this sentence, you’re not ready to restructure — spend another hour with the data first.
Minutes 5-25: Print and sort. Print every slide. Physical paper, not screen. Sort into Evidence and Narrative piles. Be ruthless — if a slide is 70% narrative and 30% data, it’s a Narrative slide. You can extract the data point later.
Minutes 25-55: Build the skeleton. Open your template. Write 5 slide titles: (1) Executive summary with your recommendation. (2) The three evidence points that support it. (3) Two or three options with costed trade-offs. (4) Your specific ask and deadline. (5) Next steps and timeline. This skeleton exists before any inherited slide enters it.
Minutes 55-85: Slot the evidence. Take each Evidence slide and ask: “Does this support my recommendation, challenge it, or provide context for an option?” Slot supporting evidence after your executive summary. Slot challenging evidence into the options section (it makes your analysis look balanced). Everything else goes to appendix.
Minutes 85-90: Title audit. Read every slide title in sequence. Do they tell your story or the original author’s? Rewrite any title that sounds like someone else’s framing. “Portfolio Overview” becomes “Portfolio Performance: 3 Accounts Underperforming Target by £280K.” The title IS the argument.
The Executive Slide System (£39) includes 51 AI prompts — including “Rewrite these inherited slide titles to reflect this recommendation.” Paste your inherited titles, add your recommendation sentence, and the AI rewrites every title to match your argument. Minutes 85-90 become minutes 85-86.
When They Ask About the Person Who Left
It will happen. Someone will reference the previous presenter. “David used to show us the pipeline breakdown at this point.” “Didn’t the last review include the regional comparison?”
What works: “David’s analysis is in the appendix — I’m happy to pull it up if it’s useful. What I’ve focused on today is [your recommendation] because that’s where I see the decision point.” This is honest, respectful of the predecessor, and redirects to your argument. It also signals that you’ve done the work — you know what was in the original deck, you’ve made a deliberate choice about what to present, and you’re focused on the decision rather than the history.
What doesn’t: “I’m still getting up to speed on David’s approach.” This is honest but undermining. It positions you as catching up rather than leading. Even if it’s your first week, the presentation is the moment to demonstrate ownership, not transition.
What definitely doesn’t: “I’ve improved on the previous structure.” Never criticise the predecessor’s work. The managing partner hired them. Their colleagues are probably in the room. Saying “I’ve improved it” implies it needed improving — which reflects on the people who accepted it previously. Just present your version. The improvement speaks for itself.
Read next: When Q&A gets tricky during your inherited deck presentation, what to do when someone contradicts your data in front of the room.
Is This Right For You?
✓ This is for you if:
- You’ve inherited a presentation from a departing colleague and need to present it this week or next
- You’ve taken over a project mid-stream and the existing deck doesn’t reflect your recommendation
- You want a structural framework for making someone else’s slides sound like yours — in 90 minutes, not 3 days
✗ This is NOT for you if:
- You’re building a presentation from scratch (use the templates directly)
- You’re collaborating with the original author and they’re still available to present with you
Built from 24 years of role transitions and inherited decks across JPMorgan, PwC, RBS, and Commerzbank. 22 templates. 51 AI prompts. 15 scenario playbooks. Instant download.
Frequently Asked Questions
How much of the inherited deck should I keep?
Typically 25-40%. In my PwC experience, 11 of 38 slides survived — about 29%. The slides that survive are always evidence-based: data, financials, client feedback, benchmarks. The slides that get cut are always narrative: introductions, frameworks, transitions, summaries. Your new skeleton replaces the narrative structure. The evidence stands on its own.
What if I disagree with the original author’s recommendation?
That’s the best-case scenario for the Transplant Method. You have all their evidence — which you can reframe to support your different recommendation. Present their data honestly (it builds credibility) and show where your analysis leads to a different conclusion. “The data gathered in Q3 supports two possible paths…” then present your preferred option with the trade-offs. You’re not contradicting the predecessor — you’re bringing fresh analysis to the same evidence.
Should I tell the audience I inherited the deck?
Briefly, and without apology. “I took over the portfolio review from David three weeks ago. Today I’ll share my assessment based on the Q3 data and outline my recommendation for next quarter.” This is one sentence in your opening — it provides context, demonstrates transparency, and then moves immediately to your content. Don’t dwell on the transition. The audience cares about the recommendation, not the handover process.
What if the original author is still in the organisation and disagrees?
Have a conversation before the presentation — not during it. Share your restructured version with them in advance. Acknowledge what you’ve kept from their work and explain why you’ve reframed the recommendation. Most professionals appreciate that their data is being used effectively, even if the conclusion is different. The worst outcome is a public disagreement in the meeting — the pre-meeting conversation prevents that.
📬 The Winning Edge — Weekly Newsletter
One executive presentation insight per week. Role transitions, inherited decks, structural frameworks, and the thinking that makes them work. No filler.
Read next: When someone challenges the data in your inherited deck, read When Someone Contradicts Your Data in Front of the Room — the framework that turns a credibility crisis into a credibility win.
Read next: If your inherited deck goes to someone two levels up, read The Skip-Level Presentation: What Changes When You Present to Your Boss’s Boss.
Your inherited deck presentation is on the calendar. The data is solid — it just needs YOUR argument. Get the structural skeleton that turns 38 inherited slides into 12 that sound like you built them from scratch.
About the Author
Mary Beth Hazeldine is the Owner & Managing Director of Winning Presentations. With 24 years of corporate banking experience at JPMorgan Chase, PwC, Royal Bank of Scotland, and Commerzbank, she has delivered high-stakes presentations in boardrooms across three continents.
A qualified clinical hypnotherapist and NLP practitioner, Mary Beth combines executive communication expertise with evidence-based techniques for managing presentation anxiety. She has trained thousands of executives and supported presentations for high-stakes funding rounds and approvals.